Monday 25 March 2013

Bias Discussion on Corset Side Front Panel


Jil Salen p.13
Jil Salen, in her book 'Corsets - Historical Patterns and Techniques' lays her Side Front Panel neatly on the grain.(see page 13)
On the very next page she notes on another corset: "...using the grain of the fabrics to flow around the body and support the bust." (see page 15)

Norah Waugh, famous for 'Corsets and Crinolines', lays her 1730-40 corset on the grain (see page 39).
She also uses Diderot's drawings from his pamphlet ' Le Tailleur d'Habits et Tailleur de Corps' but although detailed - this does not show which grain the actual fabric has been placed on - only the positioning of the bones, nor in the description based on his leaflet on how to make the stays up, does it mention where the grainline lies. (see pages 152 for the drawings and p.153, under the heading 'Eighteenth Century Stay' or the description in Corset and Crinolones.)

It's a terrible photo but, when cutting out my corset, I diligently placed it on the grainline and boy, does it help with the stitching and getting a neat straight line. BUT....

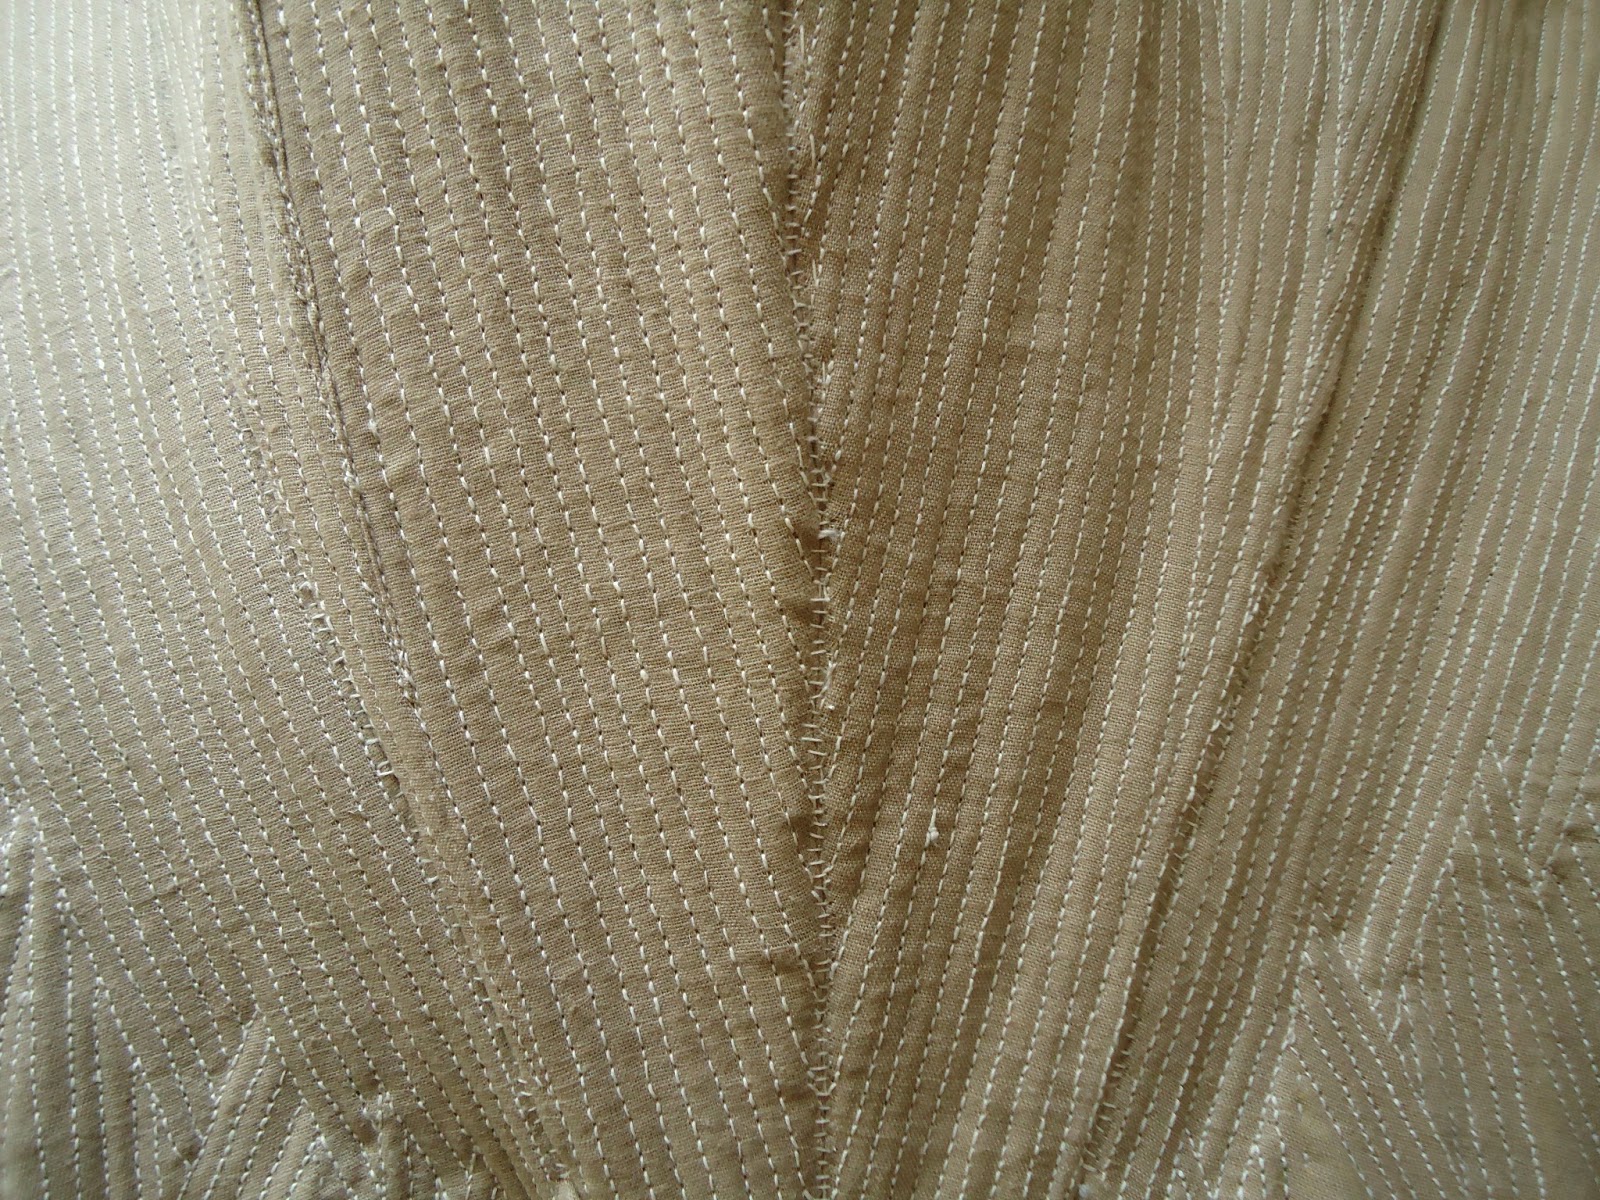
Going back over my photo's from my research sessions at The Bath Fashion Museum, and zooming into the photos, the grain lines for two of the corsets where I could get a good clear image of the weave of the fabrics, neither go along with the sweeping lines of the Side Front Panels.

If this works, I've uploaded the photo's in it's original size so you might have to scroll along but the weave of the linen should be clear enough for you to be able to trace the grain line for yourself.
I've also included a smaller image of the photo so you can see what you're looking at as a whole.

Here's BATMC 1.27.85, dated 1775-80.

(Images Courtesy of The Fashion Museum Bath and North East Somerset Council)


Here's the same image but smaller.
Image Courtesy of the Fashion Museum, Bath and North East Somerset Council.

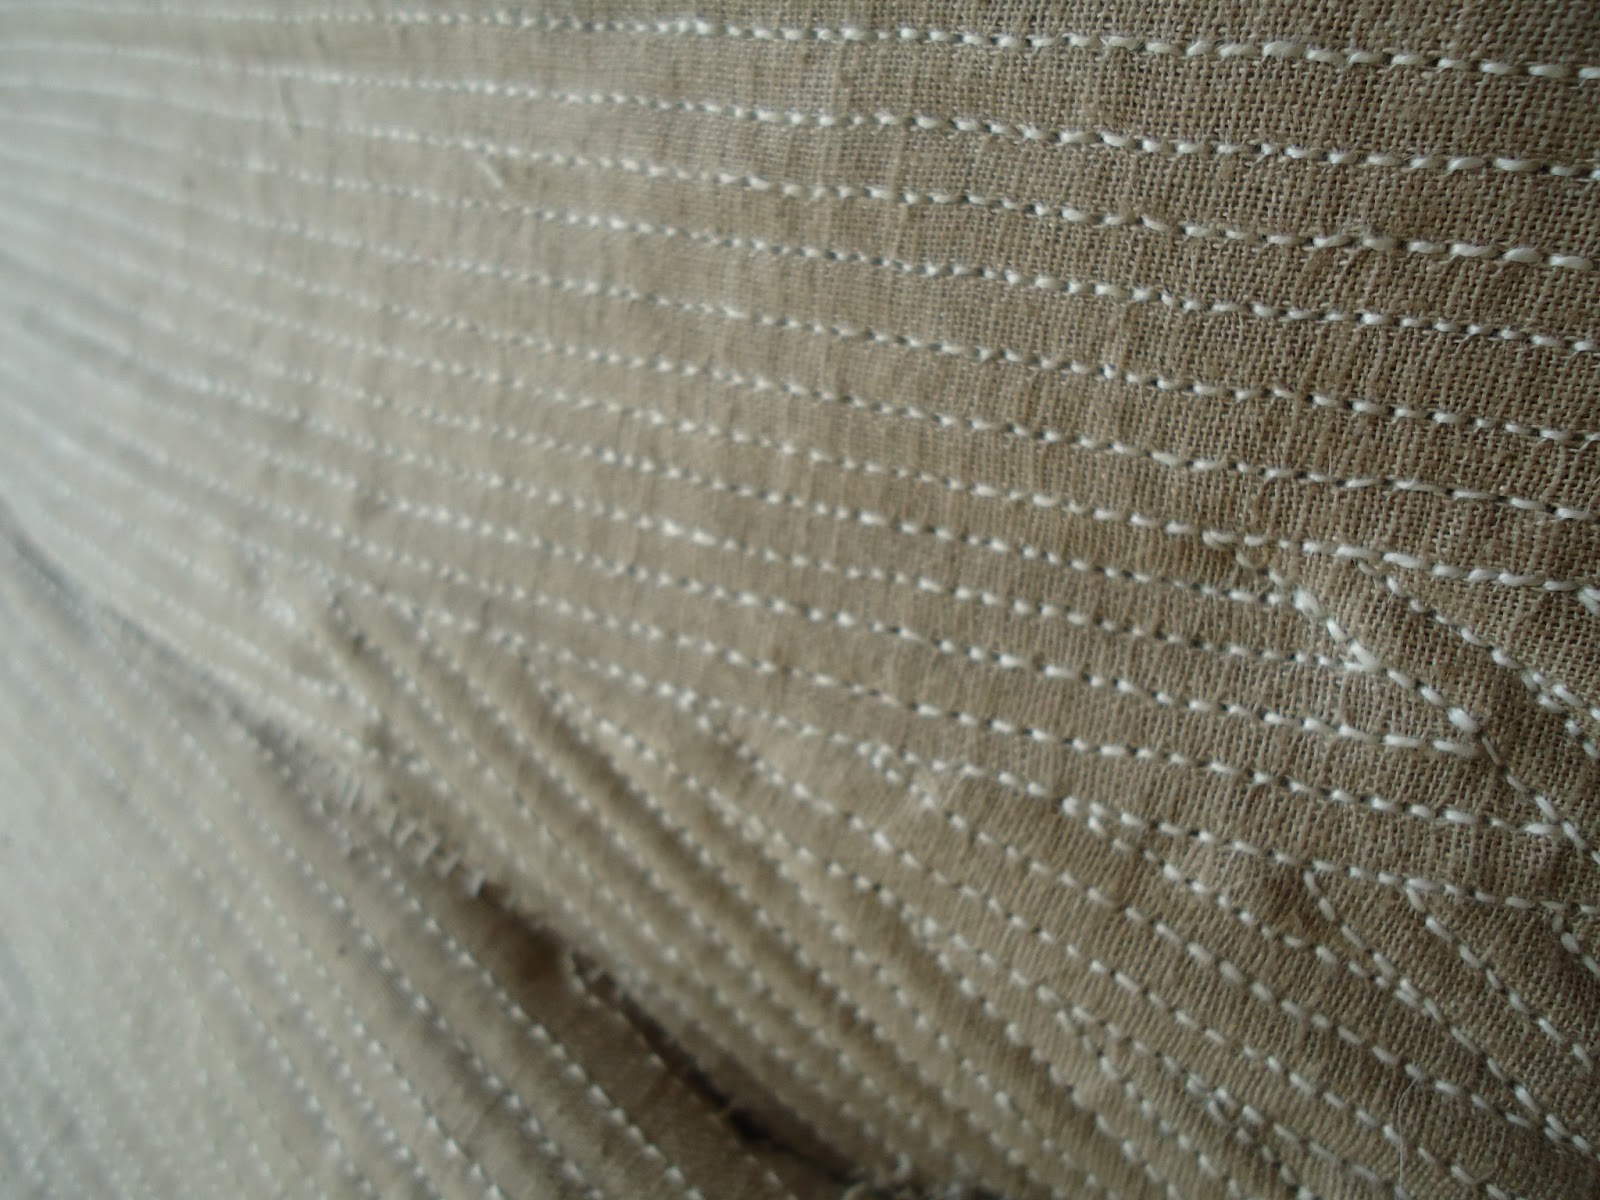
The next corset is BATMC 1.27.865 and dated 1700-1799.

Image Courtesy of the Fashion Museum, Bath and North East Somerset Council.
And again, here's a smaller image.
Image Courtesy of the Fashion Museum, Bath and North East Somerset Council.

You can see from the larger image that the grain line for this particular corset actually follows the 3rd tab (the one next to the Side Back Panel) but this seems to be the only place where it does.

I wonder about this really.
Staymaking was such an art, skill and exact science in every other aspect, that it doesn't seem likely that it was just not an important issue where the grain lay and that they just placed it anywhere. Although I admit we can't really rule this out.
What is interesting is, even while neither of the corsets from the Bath Fashion Museum match, they do echo each other: ie, the grainline running roughly with the tab closest the Side Back Panel and pushing towards (if you can imagine it) the top of the CF join.
Or using Jil Salen's image again...

roughly (and very roughly as this is a slightly different pattern shape) in this position. Although I'd say the pattern and shape of the Side Front Panel of the two from the Bath Fashion Musuem were much wider and the tab set much more to the left so that the arrow could be angle a bit more pointing to the CF top corner. But this image was really only used as a tool to be able to describe it clearly.

This post wasn't really supposed to come to any conclusion but just lay out what I've found and that it is an interesting issue and one to be continuously researched.
I guess the next worthy step would be to visit the Colchester and Ipswich Museum and see if the corset Jil Salen uses on p.11 of her book 'Corsets' could be viewed. And if it could, then there'd be plain evidence which way the grain lay. Norah Waugh doesn't mention which corsets she bases her patterns on from pages 38-44 so there's no way to verify hers.
If anyone else out there has close up images of corsets from this period and would be interested in looking at which way their panels run, I'd be most interested for your feed back.


Wednesday 13 March 2013

The Handmade Corset Update #3


It's a bit unfair because in this photo the corset looks like it's laying flat - but it's truly not! I promise. I am so excited at how similar this feels and sits to the ones I have studied in the Museums. It's a first attempt at the techniques but I couldn't be happier. Yes there's messy stitching and lines that I wish I'd done differently and tabs that don't echo the pattern but, and it's a big BUT. I feel like I've jumped miles forward in my research.

This is a photo of the stage where all the panels have been joined together. Each join will be covered with a silk ribbon and the tops trimmed with a soft skin and then the whole thing lined to finish it off, but the next stage is eyeleting the CB panels and then lacing it to my mannequin and giving it a good steam.
My hope is that this will soften some of the joins and mould the corset into a better shape.

Here's a photo of the underside - I am a little ashamed at how much extra pad stitching I had to do to pull it in, but....


And here's a photo of a close up of the CF and some of the stitching detail.


You can see from this image some of the clumsiness of the bone work along the CF line and where it's been whipped together. I'm hoping to get better at this technique. Not all of the panels have such angled boning lines so some have turned out much smoother and neater, but I'm sure practise will make perfect and a technique will be discovered.

Thanks for looking and I'll be updating the steaming stage next along with the eyelets. 
It's really coming on leaps and bounds now, after months of just hand stitching all the boning in.

Tuesday 12 March 2013

The Handmade Corset Update #2

As with any good sample there have been many many mistakes with this corset (and I know that the correct term is 'pair of stays' but to be honest it's quicker just to say 'corset' -so my apologies). 
Let's call them things I have learnt!
And I was going to list them all here but the amount of writing and explanations I'd have to do would make for a very boring looking blog. 
So first here's an update photo; the last panel's been completed and then all the sides have been wrapped in round the edge and whipped at the back. (Here be the first lesson learnt - concentrate much harder on getting the angle of the boning correct and in it's right position and it will make for a much smoother edge)

The Completed Panels:


You can already see from this photo how the two CF panels differ - that is because I ran out of the hessian backing (which I was using instead of a proper expensive linen canvas) and so had nothing to back my boning channels with.

And my undersides don't emulate the corset in the Bath Fashion Museum's undersides, my boning wanted to curve the wrong way so I copied the pad stitching idea used by tailors to control the front chest of their jackets, to pull in each panel. The corsets in the museum - it is needless to say - don't have this, theirs look remarkably flat and neat. 
Here's a photo of my underneath:


And here's the image of a corset in the Bath Fashion Museum (Image courtesy of the Fashion Museum, Bath and North East Somerset Council):


I can only imagine that their flatter boning channels result from the use of the rectangled shaped baleen and maybe slightly looser boning channels - my round cane bounced out rather too nicely thank you very much.

And the sewing of the SF Panel (the photo previous to this one above) also threw up some interesting questions on where they put the grain for this particular panel. But I want to go and do a bit more research into this and maybe do another Post for it later.

Then once all the panels were prepared, then came the stage of joining them together. This was actually slightly easier than I thought, but only slightly and my stitching would've been a lot neater had the sides of the panels been a lot neater - well we live and learn. 
Please see photo beneath...


And....


Well I think that's all for now, I've just got to finish getting them altogether and then argue over the idea of steaming first....
..... (O which means eyeleting first, but I was going to do a study into why the eyelets weren't sewn on the lining and that kind of messes me up but really I ought to do the steaming before the silk ribbon goes on as I am hoping it will soften some of the joins and the shapes of the panels....but then it might be good to see what happens to the silk ribbon while I steam just to see what they might have done and if I'm correct in my assumption they would've put the silk ribbon on after.....)